

What is DNS?
DNS translates domain names to IP addresses and that’s why it is often call the “phonebook of the Internet.”
Adding DNS records
When you first add a domain to Cloudflare, a scan of common DNS records is perform in an attempt to automatically add all of the domain’s DNS records to the Cloudflare DNS app. If you need to add records manually for a domain, follow the procedure below:
If your domain is add to Cloudflare via one of our hosting partners, manage your DNS records via the hosting partner. In this case, the Cloudflare DNS app informs customers to manage DNS outside of Cloudflare.
1. Log in to the Cloudflare dashboard.
2. Click the appropriate Cloudflare account for the domain where you will add records.
3. Ensure the proper domain is selected.
4. Click the DNS app.
5. The UI interface for adding DNS records appears under DNS Records:
![]()
6. Replace Name with a subdomain or the root domain.
Per Internet standards, Name must:
- be 63 characters or less,
- start with a letter,
- end with a letter or digit,
- and contain only letters, digits, or a hyphen as the interior characters.
Additionally, Cloudflare allows an underscore _ in the A and CNAME record Name since some modern web services support an underscore. However, Cloudflare discourages using underscores due to limited browser support.
7. (Optional) Some record types such A, AAAA, and CNAME allow a customer to toggle the Cloudflare proxy on or off. For the Cloudflare Proxy Toggle:
- An orange cloud icon proxies traffic through Cloudflare for the DNS record Name.
- A grey cloud icon ensures traffic for the DNS record Name is not proxied to Cloudflare. Cloudflare still serves DNS for a grey clouded DNS record, but no other Cloudflare features such as SSL, page rules, caching, WAF, etc are applied.
Grey cloud icons for A, AAAA, or CNAME records will expose your origin IP address to attackers and allows them to attack your origin IP address directly even if you later proxy traffic to Cloudflare. Direct attacks to your origin IP are only mitigated by asking your hosting provider to change your origin IP address.
8. The Type selection defaults to A records. Expand the DNS record types in the tables below for further instructions pertaining to each record type:
To ensure visitor traffic reaches a domain, a domain requires at least an A or AAAA record to point to the origin web server IP address or a CNAME record that points to the hostname of a hosting service.
Critical DNS records for IP address resolution:
A
A Records are necessary to direct a visitor’s browser requests to an origin web server.
To add an A record:
1. Replace Value with a real address (Please note you cannot use a Cloudflare IP).
Example: 203.0.113.34
2. Click Add Record.
Multiple A records for the same subdomain can be add with different IP addresses. Cloudflare’s DNS will alternate requests to the various IP addresses provided. However, Cloudflare’s DNS will continue to alternate traffic to all specified IP addresses even if an IP address is unreachable.
Cloudflare Load Balancing is the recommend solution for spreading traffic across multiple IP addresses while only sending traffic to reachable IP addresses.
CNAME
CNAME Records are necessary to direct a visitor’s browser requests to an origin web server. Unlike an A record, the CNAME will point to a hostname like www.example.com instead of an IP address. www.example.com would then either have an A record that lists the IP address or use another CNAME record that points to a different hostname. Eventually, a chain of CNAME records must point to a hostname that resolves to an IP address.
To add a CNAME record:
1. Replace Value with the target (destination) domain.
Example: mysite.myhost.com
Example: s3-eu-west-1.amazonaws.com
2. Click Add Record.
AAAA
1. Replace Value with a real address.
Example: 2001:db8:ffff:ffff:ffff:ffff:ffff:ffff
2. Click Add Record.
DNS records for email and email authentication:
TXT
TXT records are commonly use for mail authentication.
Review the SPF and DKIM sections of this table for examples.
To add a TXT record:
1. Replace Value with real data.
2. Click Add Record.
MX
MX Records are necessary for delivery of email to a mail server. Any MX record Server name requires a corresponding A record that lists the IP address of the mail server.
To add an MX record:
1. Click on the Value field to open a popup window for supplying further MX record details: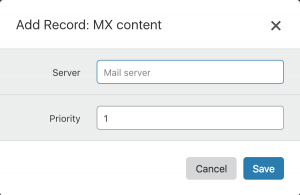
Server is the DNS hostname of the mail server.
Priority is a relative number.
The lowest Priority number in a group of MX records will have priority over the rest.
2. Click Save.
3. Click Add Record.
A typical MX record Name is the root domain such as example.com. However, reach out to your email hosting provider to confirm the MX Name and Server details.
DKIM
There is no DKIM record type. DKIM is instead configure as a DNS TXT record.
DKIM records can often exceed the 255-character limit for TXT records. Therefore, Cloudflare will automatically split these into multiple records at the same domain name, producing a record with a format similar to the following when queried:
default._domainkey.example.com. 299 IN TXT "v=DKIM1; k=rsa; p=" ";"
Remove quotation marks and spaces when adding DKIM records to your zone. Also, you do not need to prefix (escape) semicolons with a “\” character for DKIM records added to Cloudflare.
http://dkimcore.org/tools/ is a recommended online DKIM validation tool.
Some services require additional CNAME records for DKIM verification. Verification will fail for CNAME records used to verify DKIM unless there is a grey-cloud icon beside the CNAME record in the DNS app.
SPF
1. Replace Value with real data.
DNS specifications have deprecate the SPF record type in favor of TXT records.
Although Cloudflare and other DNS providers that most support the dedicated SPF record types, some DNS clients may instead look for a TXT record.
Add both a SPF record and a TXT record to your domain to ensure backwards compatibility.
SPF content as a TXT record will look similar to the following:
TXT @ v=spf1 include:example.net -all
Further details on SPF record syntax can be find at openspf.org. Contact your mail provider about SPF record content if you observe SPF failures in your email headers or if your mail is undeliverable.
DMARC
Domain-based Message Authentication, Reporting & Conformance (DMARC) allows an email recipient to know if the email is protect by SPF and/or DKIM. DMARC describes how the email recipient should process the email if neither of those authentication methods passes.
There is no DMARC record type. DMARC is instead configure as a DNS TXT record.
To learn more about DMARC records, visit the DMARC project.
Specialized DNS records:
CAA
1. Replace Value with real data.
SRV
1. Click on the Value field to open a popup window for supplying SRV record details:
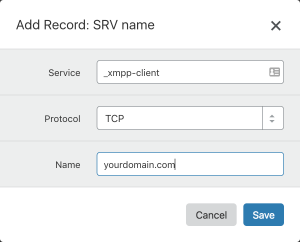
2. Create the SRV name. For example:
Service: _xmpp-client
Protocol: tcp
Name: yourdomain.com
3. Click Save. Cloudflare will combine the Service, Protocol, and Name fields to create the SRV recordname.
4. A new window will appear requesting to add the SRV content:
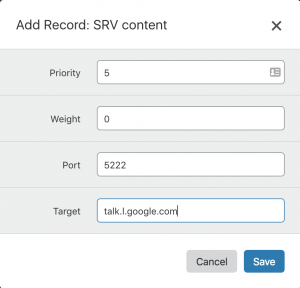
5. Add the SRV content. For example :
Priority: 5
Weight: 0
Port: 5222
Target: talk.l.google.com
6. Click Save.
Using the example data below, a DNS query for the SRV record would return the following response:
_xmpp-client._tcp.yourdomain.com. IN SRV 5 0 5222 talk.l.google.com.
PTR
For proxied domains, Cloudflare responds to DNS queries with its own shared, dynamic IP addresses. Therefore, PTR records cannot be add to Cloudflare.
The PTR record option shown in the DNS Records dropdown is not for adding PTR records for Reverse DNS resolution. It is instead for adding a PTR Record to the Forward DNS resolution for the domain. PTR in Forward DNS is allow under the DNS specification.
The main reason to have a PTR record is to prevent emails from ending up in spam folders. Since Cloudflare doesn’t support email traffic by default, you would instead need to set the PTR record where your email server is locate. Please reach out to your email provider for assistance.
Customers which with Enterprise domains using Cloudflare’s DNS Firewall feature can request Cloudflare Support for assistance with updating PTR records.
SOA
There is no need to configure SOA records when using Cloudflare’s nameservers as the authoritative nameservers. Therefore ,Cloudflare automatically creates the SOA record when you migrate your domain to Cloudflare.
Cloudflare can proxy certain DNS records.
Deleting DNS records
1. Log in to the Cloudflare dashboard.
2. Click the appropriate Cloudflare account for the domain where you will delete records.
3. Ensure the proper domain is select.
4. Click the DNS app.
5. Under DNS Records, click X to delete a specific DNS record.