
VPS
Linux VPS
Windows VPS
OpenVZ VPS
Forex VPS Hosting
Dedicated Hosting
Hosting
Web Hosting
WordPress Hosting
Windows Hosting
Web Hosting For Agencies
Use Cases
Hosting Solutions
Linux VPS
Windows VPS
OpenVZ VPS
Dedicated Servers
Server Deals
Cloud Backup
Servers For Agencies & Reseller
Resources
Rent-A-Server
Cloud
Data Center Designer
Customer References
Cloud Solutions
Compute Engine (IaaS)
Managed Kubernetes
Backup
Our Strengths
Data Backup & Disaster Recovery
Digitalization for SMEs
On-Premise vs Cloud Computing
Domains
Domain Names
Domain Transfer
SSL
SSL Certificate
Company
About Us
Data Centers
Personal Consultant
Website Checker
Favicon Generator
SEO Checker
Whois Lookup
SSL Checker
IP Address Checker
Domain Check
Partner Programs
Partner Program
Affiliate Program
Partner Network
Referral Program

Steps 1: Gather information needed for the MX pointing
1. Login into Office 365 with the valid account
2. Click on Admin
3. Under Management, click on Domains
4. Proceed as instructed to add in the domain
5. Click on Pending Verification next to the domain
6. From the Verify domain page, records the address (Example 123xyz) information to proceed further.
Step 2: Create a new TXT or MX record for verification:
TXT
=====
Record Type for TXT: @ or Empty
TXT Value: MS = 123xyz (May get once you have the records from office 365)
TTL: 3600
MX
=====
Hostname: @ or domain name
Value: 123xyz
Priority: Lower the value higher the priority (Example: 0)
TTL: 3600
Step 3: Verify Domain
1. Login into Office 365 with the valid account
2. Click on Admin
3. Under Management, click on Domains
4. Proceed as instructed to add in the domain
5. Click on Pending Verification next to the domain
6. From the Verify domain page, click on verify
7. If verification is successful, a dialogue will appear to inform you that your domain has been added to your account
8. If verification failed, it means that your domain may need more time to propagate.
9. Click on Finish, and the domain shall be listed as Active.
Steps 4: Add the MX records
Records type: MX
Priority: 0
Hostname: @
Destination Address: 123xyz
TTL: 3600
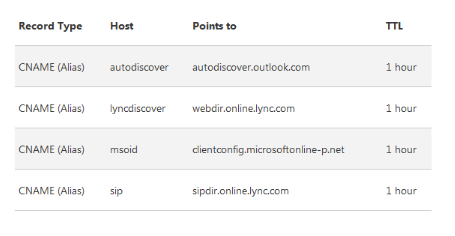
Steps 5: Add 4 CNAME records
Note: Advisable to use 3600 seconds instead of 1 hour
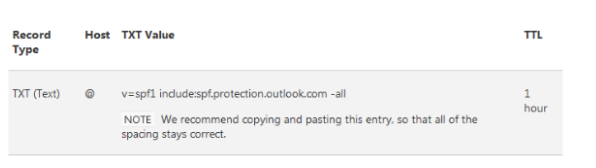
Steps 6: Add in SPF records to prevent email spam
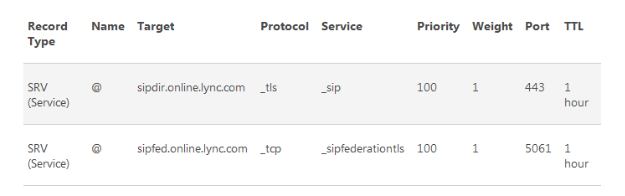
Steps 7: Add SRV records
For more information, kindly visit our Knowledge Base.